Monday, March 23, 2009

Saturday, February 28, 2009

Firebird is out of Spray.

Spray is done, I think it looks pretty good. Needs a little more final buffing and touch up, then the final build up with hardware and electronics.


Monday, February 2, 2009

Sneak Peak

I like to drill out the bridge mounting holes before spray (in this case just the bridge and not the tailpiece). This picture gives a sneak peak of what's to come. We're going with a Wilkinson roller-saddle bridge, and a Bigsby B5 trem. I'm surprised you don't see more Bigsby's on Firebirds, I think the aesthetic goes perfectly.
At this point it's just a matter of doing some final sanding and then getting it into spray.
We've decided on a 2-tone Sunburst top, transparent brown back, amber tinted neck and of course, a black headstock.
stay tuned!

Neck Heel Contour Carve

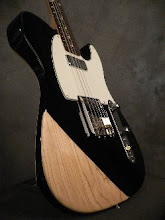
As mentioned earlier, we wanted to go with a body that was full depth (approx. 1 3/4") as opposed to the rather thin body traditionally used on Firebirds. I knew this would result in a bulky heel (where the neck meets the body), and wouldn't be very comfortable when playing the upper frets.
I knew I would end up doing some sort of relief carving/routing in this area, but wanted to wait until the neck was glued in so I could actually hold the guitar in player position and feel what was needed and where.
I ended up carving a bit of a shell shape which brings this portion of the body down flush with the neck. It's very comfortable and fits the palm of your hand perfectly as you move into the upper register of the neck.
Should look nice after spray as well, the dark banding of the sunburst finish will cover the neck joint.


Neck Set

Neck glued in, fingerboard side-dots installed.


Same shot, but now with frets.

Gluing the Neck in.

It's a big moment when you glue in the neck of a set-neck guitar.

Rear Control Cavity Route.

Routing for a rear control cavity; a second template will route for a recessed cover plate.

Monday, January 5, 2009

Pickup Routes

Here you can see the top has been glued on, and the edge routed flush with the sides. I've also routed for 2 humbucker pickups. I routed the wiring channel running between the pickups before the top was glued on.
This is some really nice looking Honduran Mahogany I used for the top. I believe we are going to finish the guitar in a 2-tone style sunburst finish, though a solid color is still being discussed.
I'm still fine tuning the neck fit and about ready to glue it in, then it'll really start looking like a guitar.


Gluing on the top

This series of pictures shows the process of gluing on the Mahogany top. The top is cut slightly oversized. I use a vacuum clamping system which allows for the top to conform to the carve of the arm contour.


Saturday, January 3, 2009

Top Layout

Laying out the the 3-piece top. I'll now cut the pieces to final width, square the edges, cut out a slightly oversized body outline, and prepare for vacuum clamping.

Resawing the Mahogany top

Here I have resawn a 3-piece Honduran Mahogany top. I will now thickness them to final width, leaving the center piece taller to keep with the Firebird aesthetic.